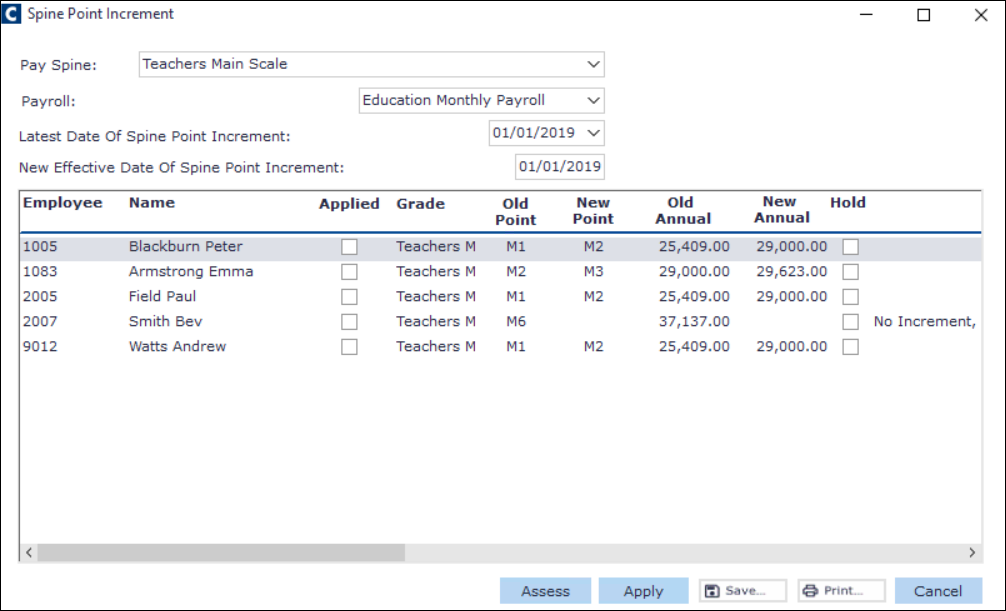
Where salaries are maintained using Spinal Column Tables and Grades, which refer to a range of points on a Spinal Column Table, and the Grade is not excluded from Incremental Processing, then this function allows you to automate the process of moving an employee to the next point on the grade until they are at the top point of the Grade. You can move an individual employee to the next Spine Point in a Grade or all the employees who are affected.
- Incremental Processing takes into consideration the pay spine, the payroll and the effective date.
- Everyone who is eligible or ineligible can be displayed in a list so that you can save or print the information
To move an employee to the next Spine Point on a Grade, you should perform the following:
- Set up the prerequisites.
- Set Anniversary increments.
- Set Fixed Date increments.
TABLE OF CONTENTS
- Setting up
- Applying anniversary increments to the employee's post history record
- Applying fixed date increments for all employees
Setting up
Define the spine point increment process
- Navigate to the desired Pay Spine form.
- Go to Cintra iQ: Employer Settings> Pay Spines> record in Navigator
- Select the Increment Basis.
- Enter the Minimum number of months at a spine point before increment.
- Select whether there is a Post date increment where minimum number of months not met?
- Click the OK button.
Define the grades
Note: For more information about the fields in the Grade form, see About the Grades Form.
- Navigate to the desired Grade Recordform.
- Go to Cintra iQ: Employer Settings> Grades> record in Navigator
- Enter a Maximum Spine Point.
- Enter a Discretionary Point, if necessary
- Exclude the Grade from Spine Point Increment Processing, if necessary.
- Set the Increment Periodicity.
- Click the OK button.
Apply the process to the employee's post history record
- Navigate to the desired employee's Post Historyform.
- Go to Cintra iQ: Employment Record> Forms> Post History
- Open the desired Post History record. The Edit Employee Post form appears.
- Enter the Next Increment Due Date. The Auto Increment option is selected by default.
- If you do not want the Incremental processing to be automated, deselect this option.
- Click the OK button.
Applying anniversary increments to the employee's post history record
Anniversary processing is driven by the date the employee starts in a post or the Next Increment Due Date within the Employee Post form. In the Employee Post History record, when you are add a new Employee Post, you can change the Incremental Processing to a different start date than the From Date of the employee in this post by using the Next Increment Due Date field. Thereafter, when an anniversary increment time comes up in the open period, it will create the new spine point, and then update this field.
Applying fixed date increments for all employees
To apply fixed date increments, you need to run the Spine Point Increment extract. Once the Spine Point Increments have been assessed, you are presented with a list of the employees on the payroll and each will either have a note reflecting that no increment is due or will show you the increment to be applied. If an record has no note, then The notes can be:
- No Increment, current sequence at maximum
- No Increment at this grade
- No Increment at this employee in post
- Increment postponed to dd/mm/yy
These notes reflect whether the employee is already at the top of the grade, that the employee is attached to a grade which is excluded from incremental processing, that the employee in this post has been excluded from incremental processing or if the employee hasn’t been in post for long enough and so when the increment is postponed to.
To apply fixed date increments for all employees
If you have not run this process before an empty form is displayed. If you have run it previously, the results of the last process is displayed.
- Navigate to the Spine Point Increment window.
Go to Cintra iQ: Payroll> Payroll Tools> Spine Point Increment - Select the desired Pay Spine.
- Select the desired Payroll.
- Enter the Latest Date of Spine Point Increment.
- Enter the New Effective Date of Spine Point Incrementfrom which the records should be active.
- You can also back date a fixed increment by entering an earlier date.
- Click the Assess button. The employee records are updated.
- At this stage, you can close the Spine Point Increment window before you commit and return to the assessment at a later time by entering the same effective date details.

(click to expand)
- If necessary, exclude any records you do not want to move to the next Spine Point by clicking the Hold option in the desired record.
- Click the Apply button. A message appears stating: Are you sure you want to commit these spine point increments?
- Click the Yes button. A message appears stating: [payroll name] Pay Spine increment has been executed successfully.
- Click the OK button. The increment appears in the Spine Point History tab of the affected employee's Post History form.
- Continue to Save and/or Print the assessment.
Note: Once you have committed the Spine Point Increments, you cannot reverse the action unless you manually apply the change to the employee's Spine Point record. Go to the employees’ Post History form, open the relevant Spine Point record and select the appropriate reason for change. These reasons are set up in the Reasons for Change Lookup table.
Was this article helpful?
That’s Great!
Thank you for your feedback
Sorry! We couldn't be helpful
Thank you for your feedback
Feedback sent
We appreciate your effort and will try to fix the article