Manage Users lets you create, delete and manage user accounts, allocate security profiles, reset passwords, and control Payroll Access and Audit Access within Cintra iQ. For more information about User procedures, see User Tasks.
TABLE OF CONTENTS
Note: You will need system administrator permissions to perform any of the tasks in this article
To reset passwords, see How do I reset a user's password in Cintra iQ?
Accessing the Manage User screen
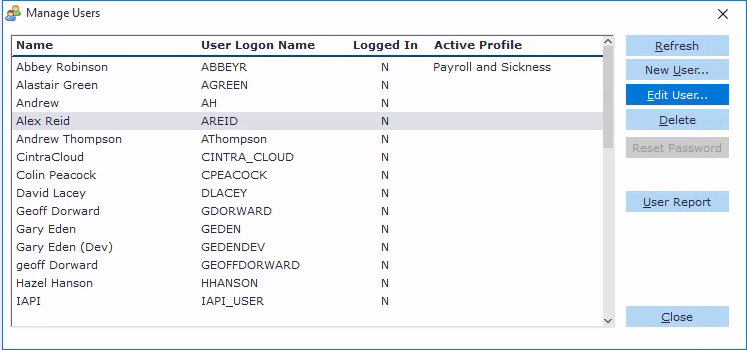
From the tool bar, click USERS. The Manage Users screen will appear.


Creating / editing a user

(click to expand)
- Within the Manage Users screen, either select a name and click New User, or select an existing name and click Edit User.
- The User Details window appears.
 (click to expand)
Setting up LDAP (Active Directory) authentication
- Within the User Details screen, click the Select Active Directory User button. The LDAP Users window appears.

- Set the Domain to IQ and choose your Base DN. Selected your user, then click OK.
- Their LDAP data will be added to the User Details.
- Click OK to save.
Main user settings
Enter or select the following Main settings:
| Name | Description |
|---|---|
| User Logon Name | Enter the name that you will use to log on to Cintra iQ. Warning: Once you create the Logon User Name, you cannot edit it - only delete it and then recreate it. |
| Name | The user's name. |
| Account Type |
Any user who is set up to be a System Administrator has the same rights as that of the current SYSADM. |
| Account Status | Active: Use this to allow the user to login when ever they want. Disabled: This means the account has been manually disabled by another System/User Administrator. e.g. This is useful if someone has left the company. Locked: This is automatically set by the system after a user has tried to login under a different password and has exceeded the number of tries. New: Use this status when creating a new account so the system can tell when the user logs in for the first time. The status will then change to Active. |
| Security Profile | Select the desired security profile from the drop down list or leave it blank. The security option is set up in Profiles and each security profiles is a collection of security definitions which are created in File Permissions Security, Menu Security, Record Security, Field Security, and Lookup Security. Warning: If the profile is left as NONE, then there is no security attached to the user. |
Payroll Access tab
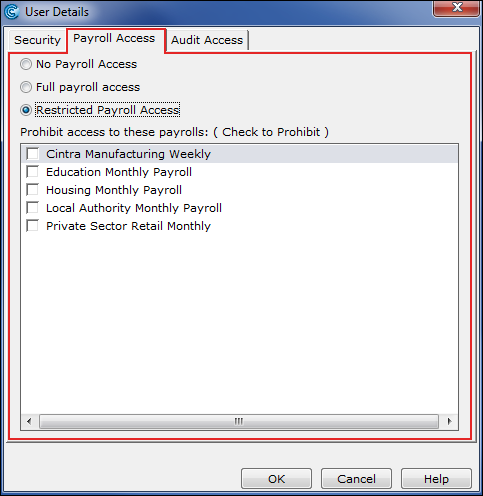
This tab affects the functions on the Payroll menu. You can restrict payroll access for different users who work with payrolls so that they only have access to specific ones.
Note: This tab does not restrict access to the Payroll Forms such as Payslips, Payroll Periods and Input, Deductions etc; It only restricts the user's ability to perform within the Payroll menus.

(click to expand)
| Name | Description |
|---|---|
| No Payroll Access | Select this option to restrict access to the Payroll menu options and to Payroll reports in the Report Writer. This is automatically set as default. |
| Full Payroll access | Select this option to allow the user to have access to all Payrolls within the Payroll menus in the Report Writer. A choice of all payrolls is displayed when selecting from a Payroll Period drop-down list. |
| Restricted Payroll Access | Select this to restrict all access to the payroll menu options with a restricted list of payrolls. Once the radio button is selected, the list of payrolls within the system appears in the Prohibit access to these payrolls: (Check to Prohibit) pane. |
| Prohibit access to these payrolls: (Check to Prohibit) | Allows you to prohibit access to specific payrolls within the system, by selecting from the list of Payrolls. |
Audit Access tab
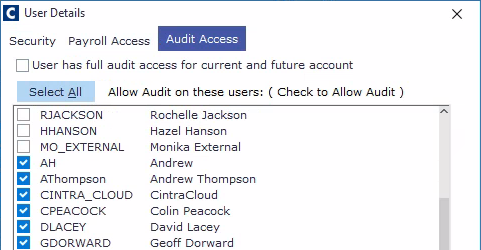
This tab displays a list of existing users. By selecting one or more existing users, you are allowing this new user to look at the audit log of their changes to Cintra iQ.
Example: An HR Manager user is newly created and is head of a team of four. If the four other users are selected in the pane, the HR Manager can audit their changes to the system.
Any security profile applied will not apply to the audit log of another user.
Allow Audit on these users: (Check to Allow Audit)
This pane contains the available users of Cintra iQ.

User Detail Report
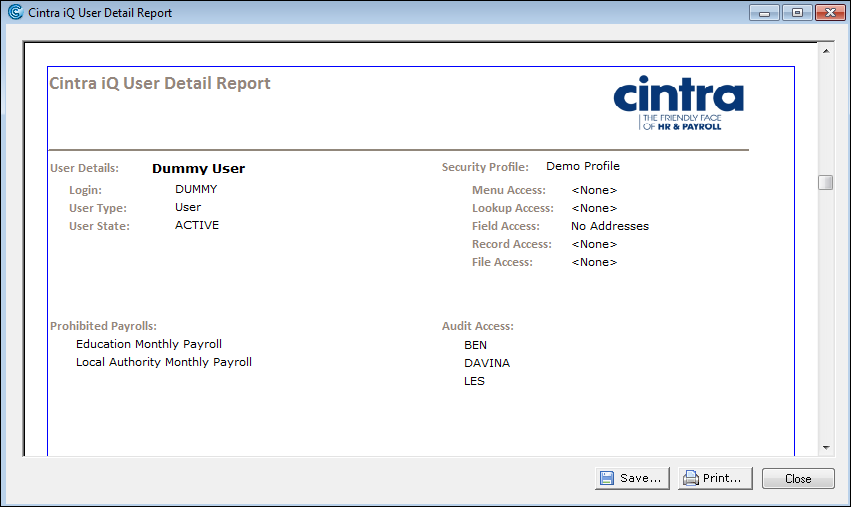
The Cintra iQ User Detail Report lets you view information about any user created in Cintra iQ. The report contains the following information:
- User's name
- Login name
- User title
- Active status
- Security profile,
- Which payrolls which they cannot access
To view the report, go to the Manage Users screen and click User Report.

(click to expand)
Was this article helpful?
That’s Great!
Thank you for your feedback
Sorry! We couldn't be helpful
Thank you for your feedback
Feedback sent
We appreciate your effort and will try to fix the article
