Within Cintra iQ, you can customise payslips to display additional fields, corporate messages and company logos on either printed payslips or Self-Service online payslips. Once the Payslip is generated, the Layout and the fields selected appear in the Additional Information columns on the employee’s payslip.
Go to Cintra iQ: Menu bar> Definitions> Reporting> Define Payslip Custom Fields/Logo. The Custom Payslip Area/Payslip Logo window appears.
Content tab field names
| Name | Description |
|---|---|
| Pension Info | Displays the Contribution rates and pensionable pay amounts in the Deductions section. |
| Loan Info | Displays principle and/or loan balance amounts in the Deductions section. |
| AOE Info | Displays any AEO deductions. |
| Post in Payslip Detail | Display’s the employee’s post on the Payslip. Note: Only applies when printing payslips in Detail mode. |
| Page Numbering | Shows the numbers of pages in the Payslip print run. |
| Show Dates |
|
| Empt Id Position | Select the position of the Employment ID: Default, Bottom, or Top. |
| Alternative Name | Applies to Layout 3 only. Alternative for the payroll name e.g. Jasper Street |
| Alternative Payroll Name Text | Applies to Layout 3 only. Alternative name for payroll text e.g. Boutqiue |
| Layout | 1 = Standard Layout with Address section at bottom of section. |
| Show Annual Equivalent | Displays annual amount, where available, against a payment. |
| Show Period Equivalent | Displays either monthly, fortnightly, weekly. lunar amount, where available, against a payment. |
| Show Pay Spine | Displays Pay Spine, where available, against a payment. |
| Show Spine Point | Displays Spine Point, where available, against a payment. |
| Show FTE | Displays Full Time Equivalent ratio. i.e. 0.8 = 4 days. |
| Show Ytd | Displays tax year to date values in the Deductions section. |
Defining the content.
- In the Content tab, select the desired payroll(s).
- Select the desired Layout to which to apply the content.
- Continue to apply the content by checking the desired checkboxes of the information you wish to see on the payslips.
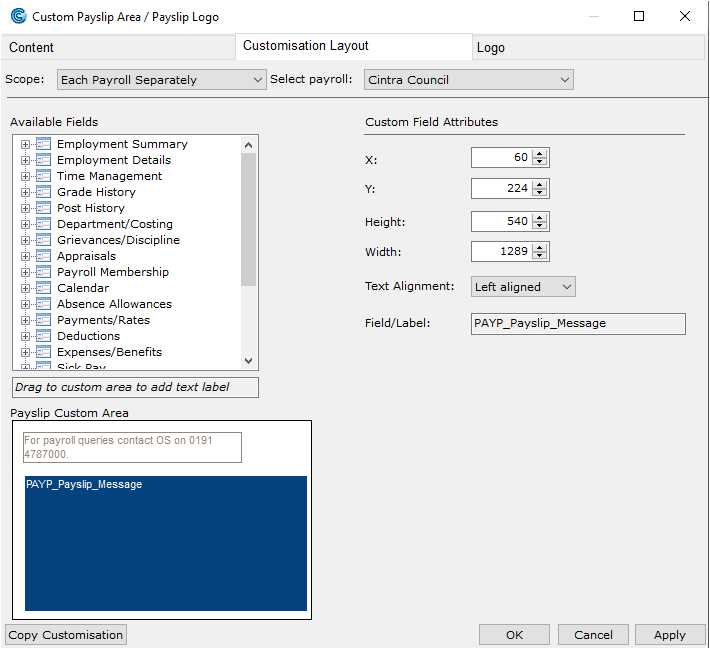
Customising the payslip's layout.
All Payrolls: The format affects all payrolls selected in the Content tab.
Each Payroll Separately: The Specific Payroll drop down list becomes active.
- Navigate to the Customisation Layout tab.
- From the Scope drop down list, select either of the following.
- Select the desired payroll.
- From the Available Fields pane, select the field(s) you wish to display on the Payslip.
- Drag the field(s) to the desired place in the Payslip Custom Area pane.
- In the Custom Field Attributessection, customise the select field’s parameters, if necessary.
- These parameters determine how much text the label will hold and where it appears. You can vary the size and position of the field by changing its coordinates and dimensions. You can also enter the Field/Label name and select right or left text alignment.
- Continue to drag and format the fields until satisfied.
- You can display text in the Payslip Custom Area by clicking in the Drag to custom area to add text label field and dragging the cursor to the desired place in the Area to add a text label e.g. Private and Confidential. If you want to display Payslip messages, for more information, see How do I add messages to payslips? Ensure the Payslip Message field (PAYP_Payslip_Message) is placed in the area as well.

Was this article helpful?
That’s Great!
Thank you for your feedback
Sorry! We couldn't be helpful
Thank you for your feedback
Feedback sent
We appreciate your effort and will try to fix the article